Quick answer
To balance a tonearm, first make sure the turntable is level and the stylus is protected while you prepare. With anti-skate set to zero and the cueing lever lowered, rotate the counterweight until the tonearm floats level, neither rising nor falling.
Once the arm is floating, set the tracking force dial to zero without moving the counterweight itself. Then rotate the counterweight and dial together to the tracking force recommended for your cartridge, before setting anti-skate to match or come close to that value.
In this guide
- How to tell whether your tonearm is adjustable or preset
- What tools and information you need before you start
- How to safely float the tonearm without damaging the stylus
- How to set tracking force using the counterweight scale
- When a digital stylus force gauge is worth using
- How to set anti-skate and check for obvious setup errors
- Common balancing mistakes that can cause skipping or record wear
Watch the article video
1. Check that your tonearm is designed to be balanced
Not every record player has an adjustable tonearm. Some entry-level and suitcase-style players use a fixed spring or preset tracking force, so there may be no rear counterweight to adjust.
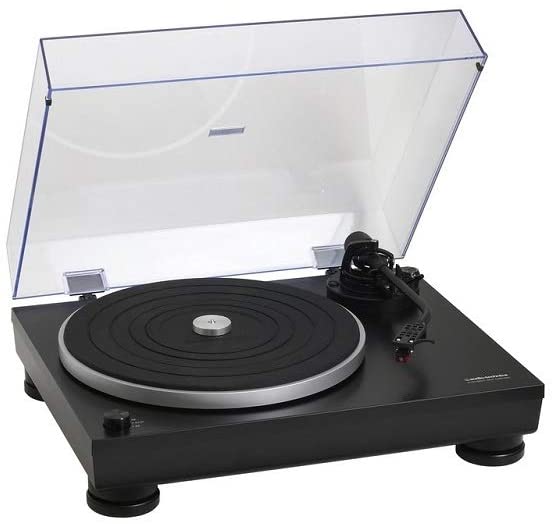
An adjustable tonearm usually has a weight at the back of the arm. On many models, this counterweight turns on a threaded rear stub and may include a separate numbered tracking force ring.
Before doing anything, look for:
- A removable or rotating counterweight behind the tonearm pivot
- A numbered dial marked in grams or with values such as 0, 1, 2 and 3
- An anti-skate control, often a small dial near the tonearm base
- A cartridge with a published recommended tracking force
If your player has no counterweight, do not try to force any part of the arm to move. Use the manufacturer’s instructions for that model, because preset arms are not balanced in the same way.
2. Understand what balancing actually does
Balancing the tonearm is not the same as setting the final playing weight. It is the starting point from which the correct tracking force can be applied.
The tracking force is the downward pressure of the stylus on the record, measured in grams. A typical cartridge maker gives a safe range, such as a minimum and maximum value, and often a preferred value in the middle.
When you float the arm level, you are finding the zero point. At this point the cartridge end and counterweight end are in balance, so the stylus has effectively no downward force.
After that, the counterweight is moved forward to add the correct force. This is why the order matters: float first, zero the dial second, set the tracking force third.
3. Gather what you need before touching the arm
A careful setup is easier when everything is ready. You do not need specialist workshop equipment, but you do need the correct tracking force for your cartridge.
Use the cartridge manual, the turntable manual or the cartridge maker’s published information to find the recommended tracking force. Do not guess based only on how the arm looks, because different cartridges and styli need different pressure.
Helpful items include:
- The turntable and cartridge manual, if available
- A small bubble level or reliable spirit level
- A digital stylus force gauge, if you have one
- A clean, stable surface with good light
- The stylus guard, if your cartridge has one
- A record you do not mind using for final playback checks
A gauge is not compulsory if your counterweight scale is accurate enough, but it is a useful way to confirm the result. It is especially helpful if the counterweight dial feels loose, has been moved before, or the turntable has been transported.
4. Prepare the turntable safely
Start with the turntable switched off and the platter stopped. Remove the dust cover or keep it fully open if it gets in the way, because you need clear access to the tonearm.
Place the turntable on a stable, level surface. A deck that slopes forward, backward or sideways can make the arm appear balanced when it is not, and it can affect anti-skate behaviour later.
Follow these preparation steps:
- Fit the platter and mat as they would be during normal use.
- Make sure the cartridge and headshell are properly fitted.
- Leave the stylus guard on while you prepare, if it does not interfere with balancing.
- Set the cueing lever to the lowered position once you are ready to float the arm.
- Set anti-skate to zero.
- Keep one hand close to the headshell so the arm cannot drop suddenly.
The cueing lever must be lowered for balancing because the cue platform can hold the arm up. If the lift is still supporting the arm, you may think the tonearm is floating when it is actually resting on the cue mechanism.
5. Balance the tonearm to find the zero point
This is the part where the most care is needed. The aim is to make the arm float level, not to let it swing freely across the record area.
If your stylus guard changes the weight at the front of the cartridge, remove it for the most accurate balance. If you remove it, work slowly and keep your fingers away from the stylus tip.
Use this ordered method:
- Release the tonearm from its rest while keeping hold of the headshell.
- Move the arm gently towards the space beside the platter, not above a record.
- Rotate the rear counterweight slowly.
- If the cartridge end drops, move the counterweight backwards.
- If the cartridge end rises, move the counterweight forwards.
- Keep adjusting until the arm floats roughly parallel to the platter.
- Return the arm to its rest and secure it before moving to the next step.
A correctly balanced arm should hover level without the stylus end dropping onto the platter or lifting high into the air. It may drift gently sideways because anti-skate is not yet set, but the vertical balance should be neutral.
6. Set the tracking force dial to zero
Many adjustable tonearms have two parts at the rear: the actual counterweight and a loose numbered ring on the front of it. The counterweight changes the force; the numbered ring is only a reference scale.
Once the tonearm floats level, return it to the arm rest and clip it in place if possible. Hold the counterweight still, then rotate only the numbered ring until the zero mark lines up with the reference mark on the tonearm.
This step does not add tracking force. It simply tells the dial, “this balanced position is zero”.
If you accidentally move the whole counterweight while setting the dial to zero, the balance point has changed. In that case, repeat the floating step rather than trying to correct it by guesswork.
7. Apply the recommended tracking force
After the dial is set to zero, the next step is to add the correct downward force. This is done by rotating the counterweight and its numbered dial together towards the tonearm pivot, following the scale.
For example, if your cartridge requires 2 grams, rotate the whole counterweight assembly until the 2 mark lines up with the tonearm’s reference line. If the cartridge maker gives a range, the middle of the range is usually a sensible starting point unless the manual says otherwise.
Use this procedure:
- Confirm the arm is secured in its rest.
- Check that the dial reads zero from the balanced position.
- Rotate the whole counterweight and numbered ring together.
- Stop at the recommended tracking force.
- Do not push down on the headshell to “help” the stylus sit in the groove.
Too little force can be more harmful than many beginners expect. A stylus that is too light may bounce, chatter or mistrack, which can scrape the groove walls rather than tracing them cleanly.
Too much force is also undesirable. It increases pressure at the stylus tip and may dull the sound, reduce stylus life and put unnecessary wear on records.
8. Check the result with a stylus force gauge if possible
A digital stylus force gauge gives a direct reading of the pressure at the stylus tip. It is a useful check because counterweight markings can be imprecise, especially on older decks or arms that have been handled frequently.
To use one, place the gauge on the platter at approximately record height. Switch it on, zero it if required, then lower the stylus gently onto the measuring pad using the cueing lever if possible.
Read the displayed value and compare it with the cartridge recommendation. If it is slightly off, adjust the counterweight in very small movements and measure again.
Be careful with gauge height. If the measuring platform sits much higher than a record surface, the reading can be less accurate because the arm angle changes. Many modern gauges are designed to sit low enough for turntable use, but it is still worth checking.
9. Set anti-skate after tracking force
Anti-skate is a small outward force that helps counter the tonearm’s natural tendency to pull inwards as the record spins. It should normally be set after the tracking force, not before.
A simple starting point is to set anti-skate to the same number as the tracking force. For a tracking force of 2 grams, set anti-skate to 2 if the dial uses matching numbers.
Some turntables use a hanging weight or a less precise anti-skate scale. In those cases, follow the turntable manual rather than assuming the numbers match grams exactly.
After setting anti-skate, play a clean, familiar record and listen for obvious problems:
- Distortion that is stronger in one channel
- Repeated skipping inwards or outwards
- The arm racing towards the centre before it touches the record
- Uneven sound on loud inner-groove passages
Anti-skate is not a cure for every tracking problem. Dirty records, worn styli, poor cartridge alignment and footfall vibration can all cause symptoms that look similar.
10. Check that the setup is correct during playback
Once the tracking force and anti-skate are set, use a normal record to confirm the turntable behaves sensibly. Start with a record in decent condition, because a scratched or warped disc can mislead you.
Watch the tonearm as it lowers. It should descend smoothly, land in the lead-in groove and move gradually towards the centre as the side plays.
The sound should be stable, without frequent skipping, harsh breakup or obvious channel imbalance. A little surface noise from the record is normal and does not automatically mean the tonearm is wrongly balanced.
If something seems wrong, check in this order:
- Is the turntable level?
- Is the stylus clean and undamaged?
- Is the tracking force set to the cartridge recommendation?
- Is anti-skate at a sensible starting value?
- Is the cartridge aligned correctly in the headshell?
- Is the record itself warped, dirty or damaged?
Do not keep replaying the same skipping section at a very low tracking force. If the stylus is mistracking, stop and correct the setup before continuing.
11. Know when to rebalance the tonearm
You do not need to rebalance the tonearm before every listening session. Once it is correctly set, leave the counterweight alone unless something changes.
Rebalance or at least recheck tracking force when:
- You fit a new cartridge or stylus type
- You change headshells
- The counterweight has been knocked or removed
- The turntable has been moved house or shipped
- You notice new skipping, mistracking or dull sound
- You are unsure whether a previous owner set it correctly
Routine cleaning does not normally require rebalancing. However, always use a gentle stylus cleaning method, because pushing hard on the stylus can damage the cantilever, which is the tiny arm that holds the diamond tip.
At a glance comparison
| Counterweight scale | Convenient and built into many adjustable tonearms. Good for normal setup, but accuracy depends on the arm and dial condition. |
|---|---|
| Digital stylus force gauge | More direct and useful for checking the real force at the stylus. Best used at roughly record height. |
| Visual float check | Essential for finding the zero point. It confirms balance but does not set the final playing force on its own. |
| Playback check | Useful for spotting skipping, distortion or channel imbalance. It should confirm the setup, not replace proper force setting. |
Frequently asked questions
Should I balance the tonearm with a record on the platter?
No, not for the floating stage. Balance the arm over a safe area beside the platter or over the platter mat with great care, but avoid letting an unweighted stylus drop onto a record.
For a digital force gauge, you can measure on the platter because the stylus needs a surface to rest on. The gauge should sit at about the same height as a record.
What if my tonearm will not float level?
Check that the cueing lever is lowered, anti-skate is set to zero and the arm is not clipped into its rest. Also make sure the counterweight is fitted the correct way round and is actually engaging with the rear stub.
If the arm still will not balance, stop and consult the manual. The cartridge, headshell or counterweight may not be compatible, or the arm may use a different balancing system.
Is it better to set tracking force at the top or bottom of the cartridge range?
For most users, the middle of the recommended range is a sensible starting point. If records skip or sound strained at the low end, increasing slightly within the approved range may improve tracking.
Do not exceed the cartridge maker’s maximum value unless a qualified technician has a specific reason. More force is not a fix for a damaged stylus, poor alignment or a badly warped record.
Do automatic turntables need tonearm balancing?
Some automatic turntables have adjustable counterweights and should be balanced like manual decks. Others are preset and do not offer user adjustment.
The automatic mechanism does not remove the need for correct tracking force. It only controls arm movement at the start or end of a record.
Why does the tonearm drift sideways while I am balancing it?
A little sideways movement can happen because of residual anti-skate, bearing behaviour or a slightly unlevel surface. During balancing, focus mainly on whether the arm floats level vertically.
If the arm pulls strongly in one direction, recheck that anti-skate is at zero and that the turntable is level. Do not let the stylus swing into the platter edge or record surface.
Can incorrect tonearm balance cause inner-groove distortion?
Yes, poor tracking force can contribute to distortion, especially near the end of a side where the groove is tighter. However, inner-groove distortion can also be caused by cartridge alignment, stylus wear, dirty records or a demanding pressing.
If tracking force is correct and the stylus is clean, the next thing to check is cartridge alignment and stylus condition.
Do I need to reset anti-skate if I change tracking force?
Yes. Anti-skate should be reviewed whenever tracking force changes, because the two settings work together.
A common starting point is to match the anti-skate number to the tracking force number, then fine-tune only if the manual or listening checks suggest a problem.
Is a heavier headshell a problem when balancing a tonearm?
It can be. A different headshell changes the effective weight at the front of the arm, and the counterweight may not have enough range to balance it properly.
If you change headshells, rebalance the tonearm from the beginning. Also check that the cartridge compliance and arm mass are suitable, as not every cartridge works well in every arm.
Final thoughts
Balancing a tonearm is a careful but manageable setup job. Work in order: level the turntable, set anti-skate to zero, float the arm, zero the dial, apply the cartridge’s recommended tracking force, then set anti-skate and check playback.
If you are unsure, use a digital stylus force gauge to confirm the result rather than relying on guesswork. Once the tonearm is set correctly, avoid moving the counterweight unless you change cartridge, headshell or stylus type.
Your next setup step should be cartridge alignment, because even a perfectly balanced tonearm can mistrack if the cartridge is not positioned correctly in the headshell. After that, learn how to clean the stylus and records safely, as clean contact between stylus and groove is just as important as the numbers on the tonearm.